Table of Contents
It's Elementary!
So let's say that you're tired of playing Warlock, but you still want to play a serious meta deck on ladder. You could try to counter the Warlocks flooding the ladder, but sooner or later, everyone else has the same idea. So what if, instead of countering the Warlocks, we counter everyone else who's trying to counter the Warlocks? Well, friend, haaaaaaave you met Bru'kan?
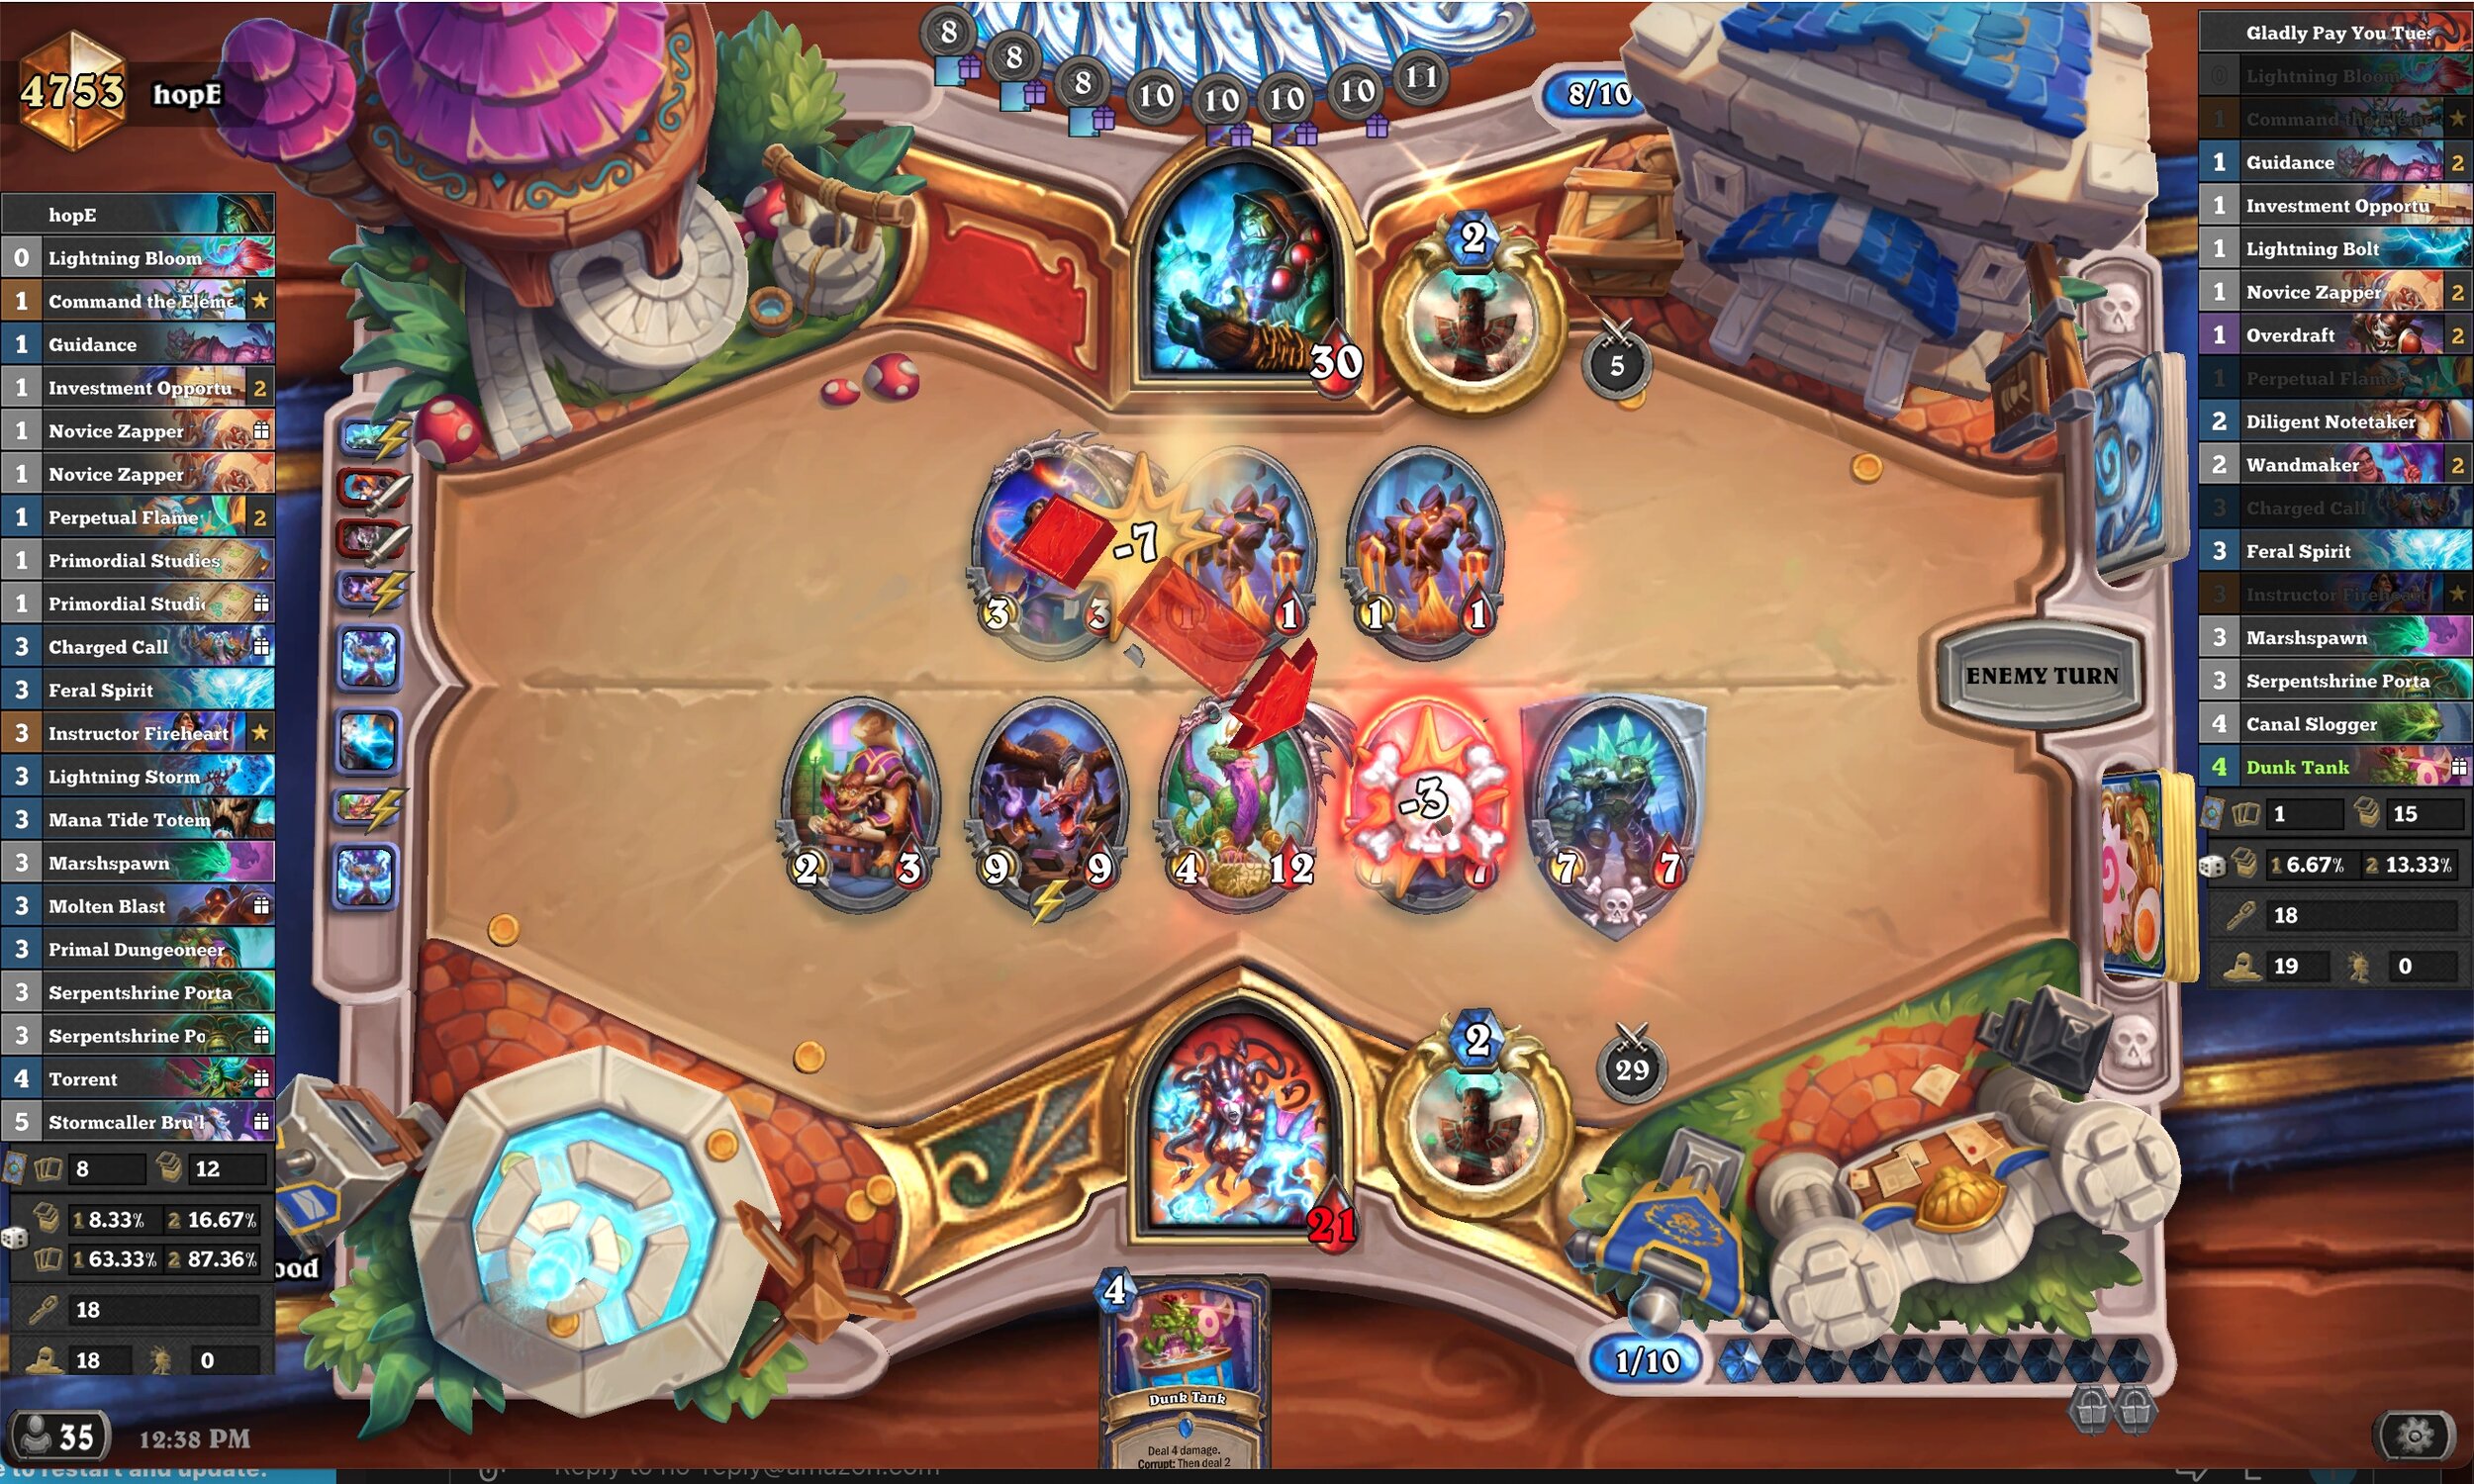
Just a normal, everyday Quest Shaman mirror board.
Quest Shaman is as close to a control deck as we have available in the United in Stormwind meta. In exchange for unfavored matchups against decks that predominantly play off the board (Quest Mage and Quest Warlock, mainly), we have even or better matchups against the rest of the field, particularly board based decks that are targeting Mage and Warlock with early aggression. Cards like Feral Spirit and Perpetual Flame directly counter that early aggression, and later on, the extreme value from doubling up spells like Charged Call and Serpentshrine Portal slams the door on those decks. This is not an easy deck to play; it requires careful turn planning to manage available mana versus overload, as well as an ability to shift focus as the deck progresses through quest completion. Players who can master the deck are rewarded with a deck that has a legitimate chance in most matchups (a rarity in this polarized meta game), and an ability to grab victory from the jaws of defeat in any matchup that goes long.
The list featured in this guide was built by Pizza and piloted to rank 3 Legend in early September. The core of the deck is fairly set, given most of the playable overload cards end up in this deck (with the exceptions of Doomhammer builds, which make room for Doomhammer, Stormstrike and Rockbiter Weapon). The main differences center around the cards used for draw and/or spell generation. Pizza's list features two Overdrafts for that purpose, which I found in my testing to be the most flexible of the available options. In addition to the obvious utility of having access to unlock your overloaded mana more often, your available mana is often at a premium, so being able to cycle a card for one mana as opposed to having to play a minion for three mana is a big improvement in my experience.
General Gameplay

The general game plan of Quest Shaman is pretty simple on the surface: Play seven overload cards, then drop Stormcaller Bru'kan, and then overwhelm your opponent with value. The difficult part is getting to that point; if you just play overload cards indiscriminately, you're going to end up too overloaded to get Bru'kan down with value alongside it and actually close out the game. Your game plan also shifts based on how far you've progressed the quest; it actually breaks down fairly cleanly into four phases, one for each stage of the quest and then after quest completion.
Phase 1: Free Overload
What you're looking for in the early game is a big swing turn where you can play multiple overload cards all at once, and then clear the overload with the stage completion. This can come as early as turn 2 with something like Guidance, Lightning Bloom and Feral Spirit, for example. Against decks that go wide, stage 1 completion should ideally include Perpetual Flame, so you can get the board clear and, if possible, develop board in the same turn with Canal Slogger, Serpentshrine Portal or Feral Spirit without the severe overload penalty. Against some decks, a tempo swing like that can be enough to win the game on the spot (even if the game doesn't actually end for several more turns).
Important detail that may seem obvious but is easy to overlook: If you have locked mana crystals from the previous turn when you complete stage 1 (or play Overdraft), you get the mana from those crystals as they are unlocked. That affects how much you can fit into the turn after you unlock, so be sure to figure that into your turn plan.
Phase 2: Building a Board
Once you're past stage 1 quest completion, you need to carefully plan out your turns to make sure you've got plays on subsequent turns. It's very easy to go all in on overload spells and leave yourself without enough mana to play anything left in your hand. In general, before you play any cards, you should think about what you're likely to want to do next turn (and possibly the turn after) and count your remaining mana to ensure you'll have enough mana left. This means not casually throwing in a Guidance, for instance, because you'll float a mana this turn, if incurring that overload means you'll be stranded next turn; you can always work that Guidance in on another turn when you're going to incur less overload.
That said, going too heavy on overload isn't always avoidable; if Perpetual Flame is going to lock all your crystals but it keeps you from dying, then you do it. When in these situations where you're forced to lock out your next turn, it's often correct to play as many overload cards as you can that turn. After all, if you're already locking out your next turn, then you may as well get the most bang for your buck, and the 3/3 taunt is not insignificant in terms of helping you survive through that locked turn. Just make sure you're going into that turn with eyes wide open; you want to create enough of a swing turn that it will take your opponent two full turns to recover, to minimize the impact of your next turn where you'll be unable to act.
Phase 3: Getting Bru'kan Down
Once we've reached stage 3, planning out our turns based on how many crystals are locked becomes even more crucial, because we want to have a turn where we finish the quest, play Stormcaller Bru'kan, and then immediately follow up with a doubled up spell or two. After turn 6 or so, just getting Bru'kan down on its own isn't usually enough unless you already have firm control of the game; spending 5 mana for what's effectively a vanilla 7/7 leaves you vulnerable if you can't use the rest of your mana afterward to start taking back the game. Depending on the state of the game, it may be correct to take a turn to address the board and allow your mana crystals to unlock before playing Bru'kan. If you do finish the quest without enough mana to play Bru'kan the same turn, you should be sure to leave yourself enough mana to play Bru'kan the following turn along with doubled spell follow-up.
Note that against Demon Hunter and Priest, it is almost never correct to end a turn with Stormcaller Bru'kan in hand. All Priests play Mindrender Illucia, and all Demon Hunters run Illidari Studies, which gives access to Star Student Stelina and Glide, even if they don't run Glide in the deck naturally. Losing or delaying access to Bru'kan may not completely end the game, but it's always going to make your path to victory significantly more difficult than it needs to be.
Phase 4: Double Up Your Spells
With Bru'kan down, the fun part of the game starts! You want overwhelming value; anything that generates minions or does burn damage to your opponent's face is typically what you're looking for. A doubled up Charged Call is the most obvious path to victory, since most decks can't deal with two giant minions late, but just chucking a bunch of doubled Lightning Bolts and Serpentshrine Portals at your opponent's face will often get the job done, too. Don't tunnel on winning on board if you have a couple of spells that go face.
Some notable spells that you might generate to look out for that get significantly better post quest:
- Vivid Spores - This ends up summoning two copies of everything that dies; if you stick this on a board with Scrapyard Colossus from Charged Call, you're effectively not losing board for the rest of the game.
- Tidal Wave - AKA Reno Jackson's Tropical Vacation. Does 6 damage total with lifesteal per minion, which almost always results in healing up to 30.
- Dunk Tank - Once corrupted, does 8 targeted damage plus 4 damage AoE.
Deck Code
AAECAYHaAwSczgPq5wPC9gOF+gMN27gDmLkD4cwD/tED8NQDiuQD+uwD4+4DwfYD5PYD8IUE+Z8E+p8EAA==
Card Inclusions
Lightning Bloom

Turns out free mana is good, especially when you can unlock the crystals afterward. Remember that this is 4 extra mana post-quest (but also 4 overload), which can get you out of a jam or find lethal.
Command the Elements
It's called Quest Shaman for a reason.
Guidance
Getting two spells and a tick off the quest for one mana is one of the best deals in this deck. It's even better post-quest because you can get up to four spells that you can double, but remember that, post-quest, you don't have to take both spells if you don't need them; it's sometimes better to take just one and spare yourself the overload, especially if hand space is becoming a concern.
Investment Opportunity
Tutors are powerful, and we need to find our overload cards.
Lightning Bolt
Cheap removal plus quest progression, and serves as 6 damage burst post-quest.
Novice Zapper
We sometimes need some extra damage to get Perpetual Flame to clear, and it's also a cheap way to tick off the quest.
Overdraft
The utility of Overdraft unlocking mana crystals in a deck built around overload is obvious, but don't overlook the Tradeable keyword. You should not be hoarding Overdrafts in your hand for a rainy day; if you don't expect to need to unlock crystals this turn or the next, trade it for something better. Overdraft is actually your primary draw mechanic in this build of the deck; if you're struggling to win with this deck, consider if you should be trading Overdraft more.
Also important: Damage from Overdraft does not double post-quest. The way that the doubling works with Overdraft is the first cast does the damage, then unlocks the crystals; when the second cast fires, all your crystals are unlocked so it does 0 damage. This is not a bug; this is the way the card behaves.
Perpetual Flame
Our win condition against aggressive decks. If you have to clear a big board, try to do that as you clear stage 1 or with Overdraft if you can. It probably goes without saying, but get as many minions as you can down into range before playing this; Hearthstone luck dictates that Perpetual Flame will seek out the 4 health minion or the one with divine shield.
Diligent Notetaker
We're a value deck, and Notetaker literally prints value. In the early game, you're looking for either extra copies of critical reactive cards like Perpetual Flame or additional quest progression, usually in the form of Guidance or Lightning Bloom. Post-quest, you're typically looking for ways to close out the game, either via additional Charged Calls or extra burn spells.
Wandmaker
There are eight 1-cost spells. Three have overload printed on them (Lightning Bolt, Perpetual Flame, and Guidance), one unlocks your mana crystals (Overdraft), and two can get you more overload cards (Primordial Studies and Investment Opportunity).
Charged Call
This is your big bomb post-quest, but don't sleep on its utility pre-quest as well. It can be good to drop at as low as 6 (or even 5 if you're desperate) if you just need board presence, taunt, or rush/charge to clear a threat. In all cases, you should know what you expect to get out of the card when you play it. The most consistent numbers are 8 and 10 both in terms of size of pool and immediate impact. Ideally, you want to overload once post-quest to get to 10 because that's where the big bombs are, and you have a 50% chance of getting exactly the one you want for the situation on each cast. Charged Call for a 9 drop is acceptable, but you're really digging hard for Runaway Blackwing at that point, and the rest of the options are fine, but not as impactful; Sleepy Dragon is a big taunt and Onyxia creates a lot of board presence, but the rest of the minions at that tier are relatively understatted battlecry minions.
Notable minions at each cost with odds to be offered a specific minion in the discover pool:
- 6 (16 minions, 19%): Cornelius Rhoame, Onyx Magescribe, Claw Machine
- 7 (13 minions, 23%): Keymaster Alabaster, Kael'thas Sunstrider, Bonechewer Vanguard
- 8 (7 minions, 43%): Al-Akir, Mo'arg Forgefiend, Arcane Devourer
- 9 (8 minions, 38%): Runaway Blackwing, Onyxia the Broodmother, Sleepy Dragon
- 10 (6 minions, 50%): Darkmoon Rabbit, Scrapyard Colossus, Deathwing the Destroyer, Y'shaarj the Defiler
Feral Spirit
The two taunts represent one of your best defensive tools in the early game while also ticking off the quest; the 2/3 taunts buy a surprising amount of time against aggressive decks, and allow for trading off divine shields or weakening minions to get into Perpetual Flame range.
Instructor Fireheart
This is your big bomb post-quest; it can chain together multiple doubles burn spells or answers to a board state. That said, don't be afraid to use it pre-quest if you need to find the last overload spells or as a panic button. It can often be game saving in those situations also.
Marshspawn
This is the least awkward of the 3 mana spell generation minions. Make sure to plan accordingly if this is part of your opening curve; if you're on the play and you have no other 1 cost spells, you may want to delay playing the quest until turn 2 in order to ensure you can get Marshspawn down on 3 (as demonstrated by Bunnyhoppor in Grandmasters).
Serpentshrine Portal
Serpentshrine Portal does everything you want a card in this deck to do. It's board development, removal, burn damage, and quest progression all in one.
Canal Slogger
Canal Slogger is your primary catch-up tool. The 6 burst healing is significant, especially if it gets to remove a threat in the process. If it sticks to the board, it often can divert resources from your opponent, because allowing 6 lifesteal damage to recur can derail many aggressive game plans. Against aggressive or burn-focused decks, it's generally correct to hold Slogger until you can take full advantage of the 6 healing (which is to say that your health is 24 or below, and your opponent has played a minion it can trade into).
Notable Exclusions / Tech Choices
Earth Elemental
Some lists run this as a single copy. It's primarily anti-aggro, and the deck is already very good against aggro without Earth Elemental. Also, we really want to minimize the number of cards that have Overload (2); even with two Overdrafts, our curve can get extremely messy with too many big overloads.
I mean, the card even has “trap” in the name…
Entrapped Sorceress/Venomous Scorpid/Primal Dungeoneer
These all seem like reasonable options to get access to more quest ticks and/or value post-quest, but three mana is a lot to spend just to get a spell. Primal Dungeoneer is often only going to draw you one card, since a number of the spells you have to run are non-Nature (Perpetual Flame, Feral Spirit, Investment Opportunity, etc.). Scorpid is fine, but unlike in Hunter and Priest, you don't really have any spells to leverage the poison. Entrapped Sorceress is particularly problematic, because it's a completely dead draw post-quest when you often need the spell generation most. Ultimately, trading Overdraft ends up more efficient than any of these options, because it only costs 1 to draw rather than 3, casting it works naturally with what the deck wants to do, and it doesn't leave a minion on board against Mage and Warlock.
Doomhammer
This increases your win percentage against the combo style decks that play off the board, though it requires a fairly different deck construction to fit in Rockbiter Weapon and Stormstrike as well. In general, this improves your matchups against decks that play off the board at the expense of your win rate against board based decks, which results in the deck just being average against everything. If that fits your play style better, it may still be worth trying, though.
Devolving Missiles
You would need to see a lot of Robes of Protection to hard run Devolving Missiles. In a tournament setting, this is a reasonable tech, but there are not enough decks that run minions that you care about devolving to run this in your deck on ladder.
Primordial Studies
The spell damage pool in Shaman is tiny; you're likely to get Novice Zapper to progress the quest, Bloodmage Thalnos or Guild Trader for draw, or Steward of Scrolls for spell generation. Since we really just want Novice Zapper most of the time anyway, we just run that in the deck and expect we'll generate copies of Primordial Studies often enough from Wandmaker and Guidance, which saves us spending one mana in the early game.
Mulligans
- Always keep: Command the Elements (obviously), Guidance, Lightning Bloom (with an otherwise good hand)
- Against aggro: Feral Spirit, Perpetual Flame, Novice Zapper (with Perpetual Flame)
- Against slower decks: Serpentshrine Portal, Marshspawn (with an otherwise good hand)
In general, you're looking to set up your early game value with the mulligan. Guidance is a tick on the quest and two extra spells, and Lightning Bloom is usually a necessary component of a stage 1 completion turn, so we want to keep that if the rest of our hand presents any sort of a plan to get there. Versus aggressive decks, Feral Spirit played on curve buys you a lot of time, and Perpetual Flame is your soft win condition against them. Against slower decks, your goal is to speed run the quest, so you keep more overload and keep Lightning Bloom more aggressively to try to get phase one of the quest done ASAP.
Matchups
Archetype names link to videos of games against that deck from my stream.
Demon Hunter
Fel Demon Hunter- Favored
Fel DH is slower than you are, and you have more damage output than they do. Try to bait out the Mo'arg Artificers and Talented Arcanists with the smaller minions; once those are gone, they can't deal with your Charged Calls. Even with Arcanists and Mo'args, Scrapyard Colossus from Charged Call can be too much for their removal to handle. Try to keep your health above 15; typically Jace does 15 damage on average, and it's hard for them to get Il'gynoth to do more than 15 damage without some fortunate Skull draws.
Quest Demon Hunter- Unfavored
Try to keep your health up to try to force them to do most of the damage with one swing of Lion's Frenzy, and try to save Feral Spirit for that turn in case they don't find Kayn. If you get Revolve or Devolving Missiles, hold those for the big Brute turn. As with any decks that play off the board, your general plan is to speed run the quest and hope they whiff on theirs.
Deathrattle Demon Hunter - Favored
Perpetual Flame can solo Deathrattle DH all by itself, since the recast happens after the deathrattle finishes resolving; hitting one of the early minions that summons a minion that dies can clear minions from the board and the hand and the deck. Just be prepared for the overload and try to time that for stage 1 completion or follow up immediately with Overdraft. In general, your board control tools handle the boards they want to build cleanly; just be prepared for Jace as a finisher and make sure your health stays above 15 (which is usually the top end of a fully loaded Jace).
Druid
Token Druid - Even
On paper, this should be a favored matchup, and when you win, it feels like it's impossible to lose, but the Token Druid has access to a lot of refill that can overwhelm your removal. Perpetual Flame timing is key; you don't want to waste value, but you also don't want to wait too long and have them Arbor Up or put minions on board that don't die to the spell. Keep an eye out for generated copies of Devolving Missiles and Revolve; you can use those to prevent them from getting a big reload off of Composting, which is generally when the matchup starts to go south for you.
Anacondra/Alignment Druid - Unfavored
You're unlikely to get your quest done before they can play Celestial Alignment, so your primary game plan is to capitalize on the fact that they do very little in the early game and try to rush them down. If you can build a decent sized board, you might put them off of the ramp/Alignment plan to force them to interact with you. Failing that, ensure that you never end a turn with locked mana crystals until they've played Celestial Alignment; being overloaded when they play Alignment means you have no mana available to play cards and you'll be forced to pass the turn.
Hunter
Face Hunter - Favored
Feral Spirit does a ton of work in this matchup. If you can play it on curve, it will negate most of Face Hunter's early game and buy you time to find your other removal for their bigger threats. If you can get to turn 5 reasonably healthy, that will allow you to respond to their Trampling Rhinos with Canal Sloggers, at which point you should have outlasted most of their damage output. From that point, just build a board and find lethal.
Quest Hunter - Even
Ideally, you're going to speedrun the quest and outrace Quest Hunter, but that's not always possible. Failing that, keep your health up and use your Canal Sloggers to this end. Both the 6 health from the lifesteal and the damage it will soak from the Hunter's spells and hero powers are relevant there. If you can progress your quest early without summoning minions, that will slow the Hunter down, but don't be afraid to put minions on board if it keeps your quest progression going. Feel free to play Charged Call pre-quest in this matchup if your quest progression has stalled out; a big threat on board will soak a ton of damage, and it could even just turn into a win condition on its own if the Hunter can't find something like Professor Slate to clear it.
Mage
Quest Mage - Unfavored
The way to slow Mage down is to not play minions in the early game, and Quest Shaman isn't really set up to do that, because several of our key overload cards either are minions or generate minions. Try to speed run your quest as much as possible, keeping minions off the board when you can but not to the expense of delaying quest progression. Don't pop the first Ice Barrier unless it will let you do a significant amount of damage immediately, because that just lets them play the second one that may be stuck in their hand and set you back further. Ideally, you'll be using doubled Lightning Bolts, Serpentshrine Portals and generated Dunk Tanks to get lethal so you won't need to worry about the Ice Barrier anyway.
Paladin
Handbuff/Secret Paladin - Favored
Pay attention on turn 1 if you go second. Secret Paladin sometimes likes to throw out Oh My Yogg on 1, and if you don't test with the coin, you'll end up losing the quest.
The goal with Paladin is always to develop and remove; if you can keep them off the board, they can't hurt you. Playing Feral Spirit on curve is a pretty good way to stall, and using Serpentshrine Portal to remove minions allows you to develop board of your own to be able to trade off divine shields. Be careful of going too wide once you get beyond 6 mana; their primary comeback mechanism is Samuro with Conviction, so hold back some resources to rebuild after that. Once you've seen Samuro, they can't easily answer a wide board, so just keep putting butts on board and remove theirs, and you'll eventually attrition them out of the game. Discovered Revolve/Hex/Devolving Missiles can also help clean up troublesome boards in a pinch.
Priest
Shadow Priest - Favored
The standard anti-aggro game plan applies - Mulligan for Perpetual Flame, Novice Zapper and Feral Spirit and whittle down their board while using the quest stage completions to your advantage. If they play Cult Neophyte or Voidtouched Attendant early, try to clear it along with several other minions to reduce the odds that they get it back from Raise Dead.
Rogue
Miracle/Garrote Rogue - Unfavored
As with most off-board decks, we don't usually pressure enough to divert them from their game plan or make them use resources sub-optimally. That said, trying to do that is the only path to victory; you want to build a board early and hit face as much as possible to pressure their life total. Aside from that, keep your health as high as possible to force them to have to find the full 32 damage combo to be able to win. They usually don't struggle too hard to do that, but at least make them work for it.
Quest Rogue - Favored
Quest Rogue is a board based deck, and we excel against those. Use your usual board control tools to counter their early game, and if they do manage to complete the quest and get Scabbs stealthed, make sure your health is out of range and save Feral Spirit (ideally with stage 2 completion) to force them to have multiple SI:7 Assassin comboes to clear a path for Big Scabbs.
Weapon Rogue - Favored
Your deck features the two things that Weapon Rogue hates most - Taunts and wide boards. Heck, Feral Spirit is both of those in one card. Just go wide, choose taunts from Charged Call (no need to wait for the quest for extra value; the game won't go that long), and heal with Canal Slogger when they play minions.
Shaman
Quest Shaman - Even
This matchup is effectively several turns of posturing followed by a couple of turns of nonsense. Keep in mind that you don't necessarily need to get to quest completion first; it's more important to have value from Bru'kan once you get there. Usually whoever has more post-quest value will win this matchup.
Elemental Shaman - Favored
Elemental Shaman is your standard anti-aggro game plan. Try to get Feral Spirits down early, clean up the initial board with Perpetual Flame and Serpentshrine Portal, and heal up in the midgame with Canal Slogger. If they don't snowball out of control really early, you should be able to outlast their initial assault and take board from them with enough life to survive their burn. If they play Doomhammer, try to time stage 2 completion for after Doomhammer comes down, ideally alongside Feral Spirit.
Warlock
Quest Warlock - Unfavored
I won't lie to you; this matchup can feel miserable. Your main goal is to speed run the quest while also presenting threats to force them to play cards; the more you allow them to just sit back and draw, the faster they get their threats online and put you on the defensive, and once you're in that position, it's very hard to come back. If you have transform effects, try to hit Giants with them; even if you turn it into a 7 cost minion, as long as you can kill it, they can't replay it for free from Raise Dead. If you can make them react to your board consistently you might be able to get them into a position where you can burn them down for lethal, but you're also hoping they don't find Soul Rend or have other ways to remove your board easily.
Warrior
Playing Against This Deck
If your deck's strategy is board based, you want to apply consistent pressure early, especially with high health minions or divine shields. Perpetual Flame is Quest Shaman's best removal tool, but it's fragile; even one divine shield or minion out of range can completely disarm it. If you do need to play into Perpetual Flame, try to do so after stage 1 quest completion; the overload is significant when it doesn't get cleared automatically, and the turn it gives you can be enough to push through. The way you win is typically by forcing the Quest Shaman to overload more than they want to, and exhaust their resources prior to quest completion. Bru'kan doesn't matter if you have no spells to double.
If your deck wants to win off the board (Quest Mage, Fatigue Quest Warlock, Garrote Rogue, etc), your path to victory is much easier. Just do what your deck naturally wants to do, and you'll likely outrace the Quest Shaman. This deck takes a while to get going, which means it often has trouble mounting an offense scary enough to put you off your game plan, and the only healing it has access to requires minions on your side of the board to lifesteal from.
Conclusion
Thanks for reading! If you enjoy this content, please follow me on Twitter and subscribe to my podcast, Off Curve. I also stream on Twitch, so please follow there as well!